Software
We provide the software, which could be used to command the printer to engrave or cut, according to the input file.
Basically, Cura, for example, converts STL files to GCODE files to be sent to the printer; JVElaser does a similar thing: it accepts input in several formats and produces a GCODE compatible with most 3D printers.
Just to emphasize: the source files cannot be edited in JVElaser; their dedicated editors should be used for that. JVElaser only prepares the G-code to burn those files.
Working with JVElaser is simple:
- Open a file in one of the compatible formats.
- Adjust how various layers of that file are engraved or cut.
- Configure the G-code generation to match your printer (you only need to do this once!).
- Produce the G-code itself, which can be used by the 3D printer directly.
Opening Files
Click the Open Graphics button and select the file you want to burn. Alternatively you can drag and drop the file from explorer / finder into JVElaser main window, drag and drop the file onto the JVElaser icon or configure the file of that type to be opened by JVElaser.
| File Type | Use Case | A layers is produced for each… |
|---|---|---|
| JPG and PNG images | Pictures | … dominant color in the picture |
| STL shapes | Stereolithography | … area having its own height in the object |
| PLT or HP-GL programs | Plotter | … pen used in the drawing |
| SVG images | Vector | … dominant color in the picture |
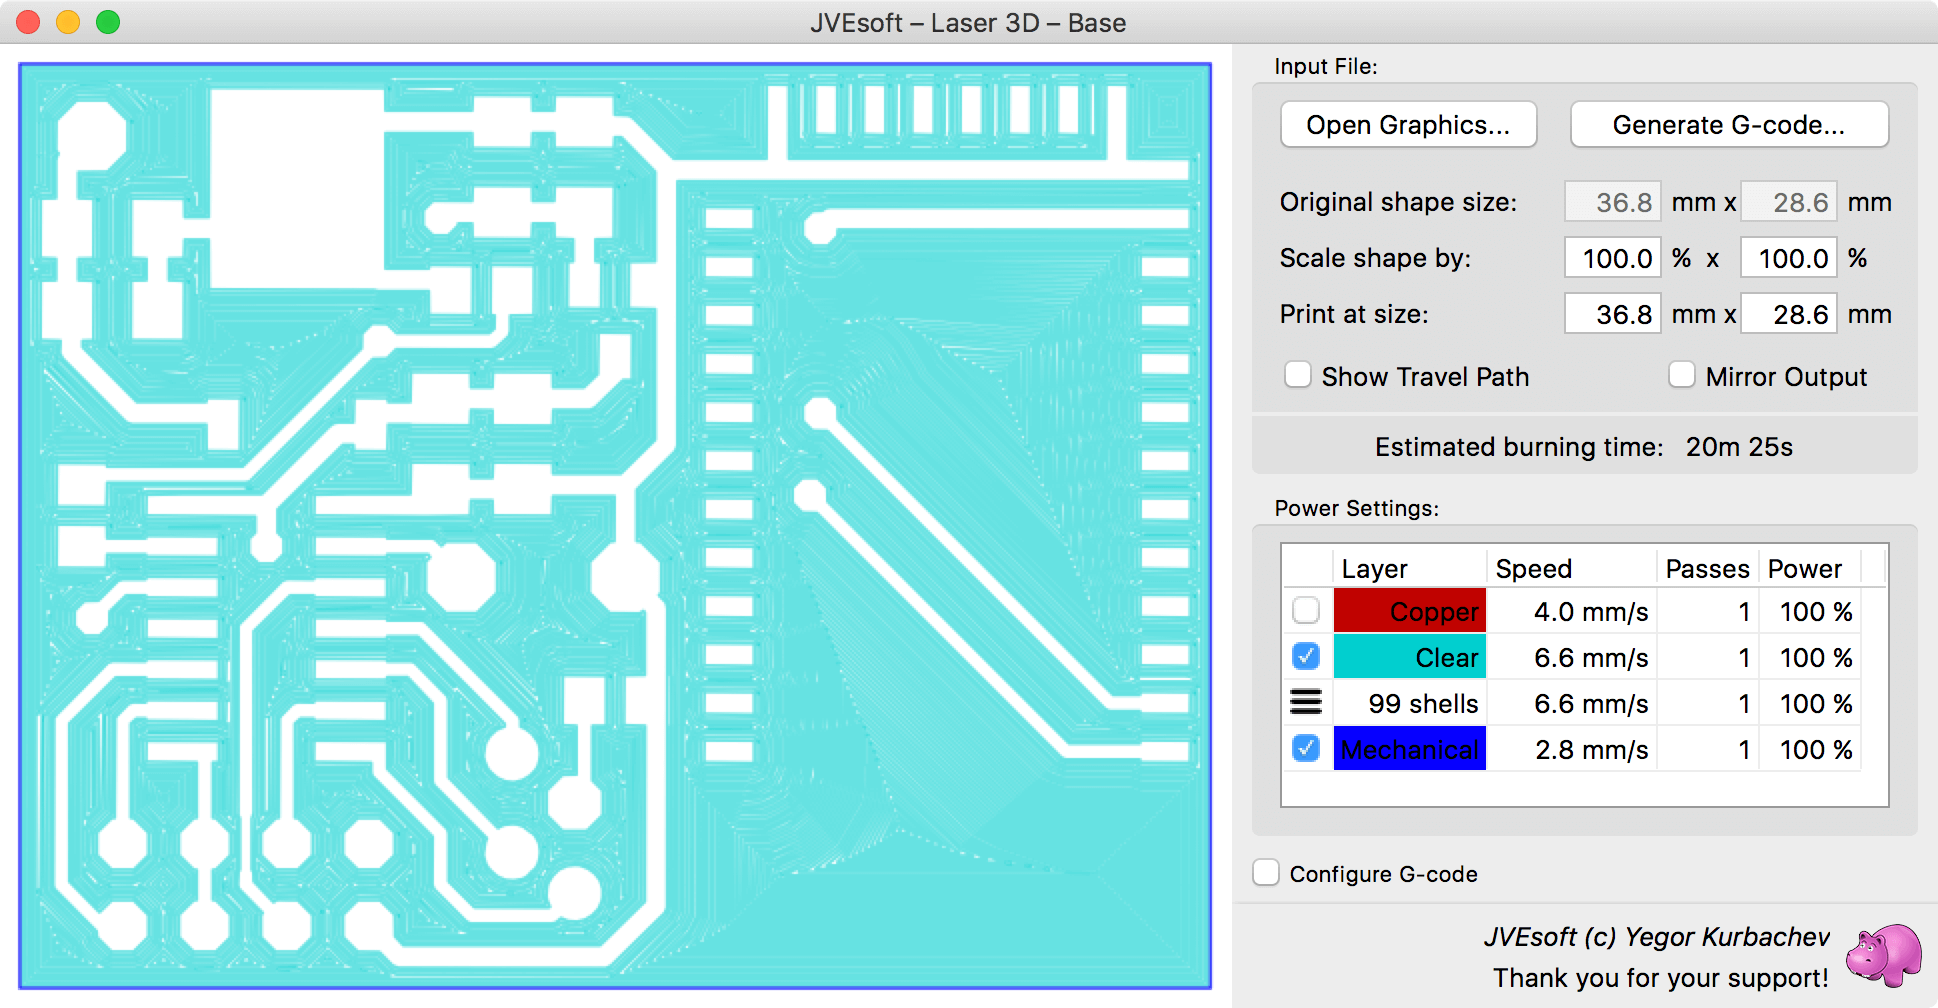
| Gerber Files | PCB | … copper, mask and mechanical layers |
Not all file types are fully supported, for example both PLT and SVG only support the graphics, not the text, which the format, theoretically allows to embed.
Usually, if the file has an unsupported feature it will be readily noticeable either with an error message or with a grossly misshaped preview. In such a case, please send us the example at laser@jvesoft.com and we shall do our best to fix the issue in the coming releases.
Layers
Once you have opened the file and the preview is presented, you will notice at the right a list of layers, into which the file was decomposed.
For each layer you can select how it should be burned. The following properties are configurable:
- Print – allows you to disable printing of a given layer. By default all the layer are printed, except for the ones closest to white.
Any layer not selected for printout will not be presented in the output preview.

- Speed – this is the most important parameter, it controls at what speed should the laser move when engraving / cutting the material.
The slower it moves, the deeper the cut. You should test your laser with different speeds and different materials to learn how to configure the speed to your satisfaction.
It should be noted that the 3D printer has a minimum speed with which it could move (in case of Wanhao Duplicator i3, for example, the minimum speed is about 3mm/s or about 0.1”/s). You will be able to discover this by trial and error and if the minimum speed is not slow enough, simply burn in several passes. - Passes – indicates the number of times the laser should repeat each burn. Use this, for example, if the low power laser is unable to cut your material in a single pass.
Hint: for best results, use odd number of passes for lines (1, 3, 5, …) and even number of passes for area filling (2, 4, …). - Power – this allows you to configure the power output of the laser (in percents).
Notice, better results and faster printouts are usually achieved by increasing the speed and not by reducing the power; always keeping the power at 100% is our advice. - Shells – for filled layers (as opposed to contour layers) JVElaser can first burn a perimeter of each shape and then fill its insides. This normally results in a higher quality of the edges of the objects.
This parameter can be used to specify how many perimeters (or shells) should be printed before the inside is filled with parallel lines. - Lines Direction – click on the icon to change – allow you to change the layout of the parallel lines, printed within the objects perimeters.
Different angles might produce different effects on some materials (like wood, for example), especially if you use different angles for different layers and they are allowed to contrast.
Configuration
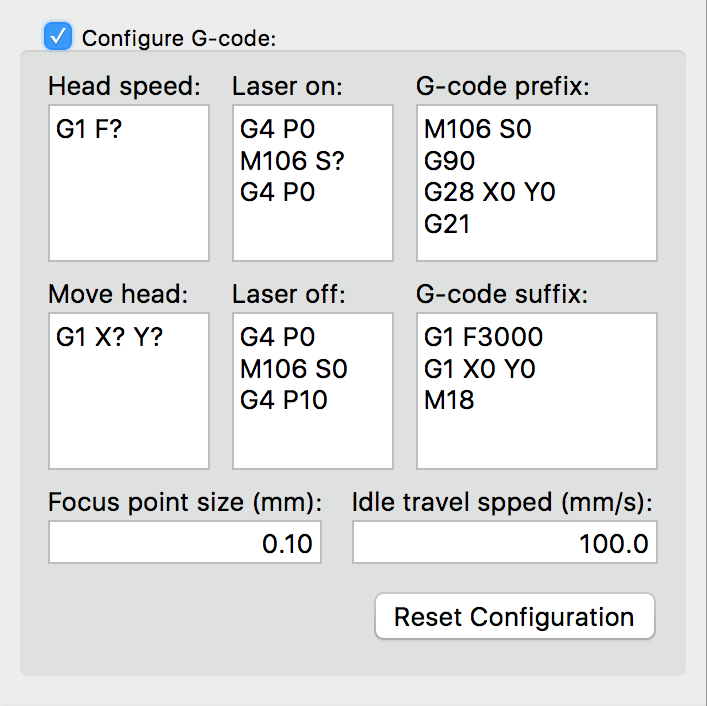
JVElaser records its configuration for next uses, so normally you only need to do this once.
The application comes preconfigured with the most commonly supported flavor of the 3D printers language. Here are the commands, you can reconfigure:
- Head speed – set the movement speed to a given value (“?” is replaced with the actual speed in the resulting G-code).
- Move head — moves the laser to the given coordinate (first “?” is replaced with an X position, the second one with the Y position).
- Laser on — turns on the laser (“?” is replaced with the PWM power setting).
- Laser off — turns off the laser.
- G-code prefix — this is the prefix to be inserted at the start of the file.
- G-code suffix — this is the suffix to append to the file.
At any point you can click the Reset Configuration button to return to our default setting.
The Idle Travel Speed, which you specify in mm/s (about 40mil/s per unit) is used to move the laser, when it’s not burning (i.e. between burned objects). Set this to the speed under the maximum speed supported by your printer (because the maximum speed does not take the weight of the laser into account).
JVElaser comes preconfigured with idle movement at 100mm/s (about 4”/s), which normally results in a consistently good performance.
The Focus Point Size indicates at what distance from one to the next the strokes should be made, when filling an area. Depending on the material and the desired result you might want to reconfigure this values to your liking.
G-code
At the top of the screen JVElaser presents the information about the size of the burned image. The following details are provided:
- Original shape size – this is the size provided by the file. Not all file formats actually contain information about the output size.
- Scale shape by – allows you to change the size of the output by a given factor or percentage.
- Print at size – allows you to change the size of the output by providing a specific size.
Notice, plotter – *.PLT, *.HPGL, stereolithography – *.STL, some vector files – *.SVG and all gerber files know the required output size and that value is used to populate that field. For other files an arbitrary size is selected (the arbitrary size will still respect the original aspect ratio).
Mirror Output option allows you to produce a mirrored output, useful when burning a back side (for example of a PCB), based on the front view.
Show Travel Path option does not affect the output, instead only affecting the on-screen preview. It allows you to see how the laser travels, as it burns the image, instead of the image itself. Notice, this option is only actually useful, when the output is not too large (or if the screen resolution is very high).

Under all other options, an Estimated burning time is presented. When JVElaser application is busy, it presents a progress bar in place of the estimate.
When all the configuration is done, you can click the Generate G-code button, which will produce the G-code file, which you can burn with. The 3D printer operation itself is no different for laser burning than it is for 3D printing.